
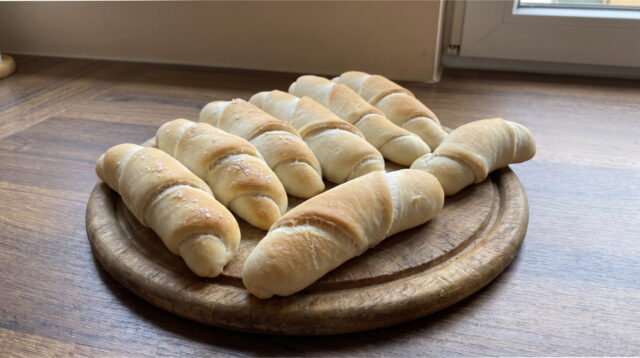
Plain flour, yeast, a bit of oil and water create beautifully fluffy bread rolls that are soft inside and pleasantly crispy on the outside. Still warm, they taste great on their own or spread with butter, and their aroma will brighten up breakfast or a homemade dinner.
This recipe can be made in a stand mixer or by hand without any special equipment. Just knead the dough thoroughly, let it rise, and roll each triangle tightly. Before baking, you can sprinkle the rolls with poppy seeds, sesame, or salt to taste.
What You’ll Need
- 500 g plain flour,
- 300 g lukewarm water,
- 20 g fresh yeast or 7 g dry yeast,
- 10 g salt,
- 5 g sugar,
- 20 g oil,
- water for brushing,
- poppy seeds, sesame, or salt for sprinkling, to taste.
Step-by-Step Preparation:
1. Preparing the dough in a mixer: If using a stand mixer, place all ingredients in its bowl. Knead the dough with the dough hook for about 8–10 minutes, until it is smooth, elastic, and no longer sticks to the sides of the bowl.
2. Preparing the dough by hand: If making by hand, add the flour, salt, and sugar to a bowl. Crumble the fresh yeast into a small bowl, pour in a little lukewarm water, and stir. Then add it to the flour along with the remaining water and oil.
3. Kneading by hand: Combine the ingredients by hand and knead the dough for about 10 minutes. The finished dough should be smooth, elastic, and soft, but not unpleasantly sticky.
4. First rise: Cover the kneaded dough with a cloth or plastic wrap and let it rise for 45–60 minutes. Continue once it has roughly doubled in size.
5. Dividing the dough: Divide the risen dough into 8–10 equally sized pieces. Even portions ensure the rolls will be similar in size and bake in about the same time.
6. Shaping the rolls: Roll each piece into a triangle and, starting from the wider end, roll it up tightly into a crescent shape. Rolling tightly helps the rolls keep their shape during rising and baking.
7. Second rise: Place the shaped rolls on a baking tray lined with baking paper. Let them rise for another 15–20 minutes on the tray.
8. Finishing before baking: Preheat the oven to 220 °C with top and bottom heat. Brush the rolls with water to help create a crispier crust, and sprinkle with poppy seeds, sesame, or salt as desired.
9. Baking: Bake the rolls in the preheated oven for 12–15 minutes, until beautifully golden. For an extra crispy crust, you can place a small cup or bowl of hot water in the oven during baking. The resulting steam will help keep the inside soft.
10. Cooling and serving: Let the baked rolls cool at least briefly. They are best fresh, but also taste great the next day, when you can reheat them lightly in the oven.
How to Achieve the Right Shape and Crust
The dough should be soft, smooth, and elastic, but not sticky. When shaping, roll each triangle tightly so the rolls don’t unravel during baking and keep a nice shape.
Use water instead of egg for brushing, as it will give the crust more crunch. For an even better result, use steam from a cup or bowl of hot water placed in the oven during baking.
How to Store Homemade Rolls
Once completely cooled, store the rolls in a cloth bag or paper wrapper. They taste best fresh, but stay soft until the next day. Before serving, simply reheat them lightly in the oven.
You can also freeze the rolls and finish baking them later. This way, you can easily prepare a supply of homemade bread for your next breakfast or dinner.
Final Tip
If you want to expand your home baking repertoire, next time try homemade olive ciabatta with a crispy crust and fluffy crumb. Another option is homemade red lentil bread without flour, which tastes great fresh or the next day.