
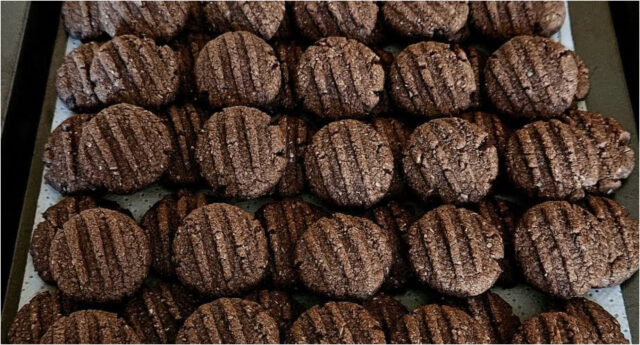
Butter, cocoa, and shredded coconut come together to make delicate homemade cookies with a rich aroma and the classic ridged surface. They’re made from a simple dough that just needs to be shaped into balls, pressed with a fork, and briefly baked.
There’s nothing complicated about the preparation, but it’s important to keep a close eye on the cookies while baking, as they can burn easily. The finished cookies can be served once cooled, but their coconut flavor becomes even more pronounced if you let them rest for a while.
What You’ll Need
- 200 g butter,
- 100 g powdered sugar,
- 240 g plain flour,
- 100 g shredded coconut,
- 2 egg yolks,
- 2 tablespoons cocoa powder.
Step-by-Step Preparation:
1. Preparing the dry ingredients: Sift the flour onto a work surface. Add the powdered sugar, shredded coconut, and cocoa powder, and mix all the dry ingredients together so the cocoa and coconut are evenly distributed in the dough.
2. Adding the yolks and butter: Make a well in the center of the mixture and add both egg yolks. Cut the butter into smaller pieces and add them to the rest of the ingredients. Smaller pieces are easier to incorporate into the mixture.
3. Working the dough: Knead all the ingredients together thoroughly by hand until a cohesive dough forms. Work carefully to ensure there are no separate pieces of butter or unmixed cocoa left in the dough.
4. Preparing the oven and baking tray: Preheat the oven to 170°C. Line a baking tray with parchment paper, which will prevent the cookies from sticking during baking and make them easier to transfer once baked.
5. Shaping the balls: Gradually shape small balls from the prepared dough. Arrange them on the lined baking tray, leaving space between each one so the cookies don’t touch when pressed.
6. Creating the signature pattern: Press each ball down with a fork to form a disc. The fork tines will also create the characteristic ridged pattern on top, making these homemade cocoa-coconut cookies instantly recognizable.
7. Baking: Place the tray in the preheated oven at 170°C and bake the cookies for about 10 to 15 minutes. Watch them closely, as they burn easily and the dark cocoa dough can make it hard to notice color changes.
8. Checking for doneness: Once the cookies start to smell fragrant and firm up slightly, gently test their firmness with your finger. Take them out of the oven at this point to avoid overbaking. Be careful during this step, as both the tray and cookies will be hot.
9. Cooling and resting: Let the baked cookies cool down. You can serve them once cooled, but if you want a more intense coconut flavor, let them rest before serving.
How to Tell When the Cookies Are Baked
With cocoa dough, you can’t rely on a golden color, so focus mainly on the aroma and firmness. The cookies are ready to come out when they start to smell strongly and their surface firms up slightly when touched gently.
Baking time is usually between 10 and 15 minutes, but check the cookies regularly. Don’t leave them in the oven longer just because they still look dark—the cocoa color is hard to judge during baking and they could burn.
How to Create an Even Fork Pattern
The key to a uniform look is making small, even dough balls. After placing them on the tray, press each one evenly with a fork, which flattens the dough and creates the classic ridges at the same time. Apply enough pressure to flatten the dough, but not so much that the cookie falls apart.
Keeping the balls a similar size helps ensure all the cookies bake at the same rate. This also makes it easier to determine the right moment to take the whole tray out of the oven.
Why Let the Cookies Rest
Resting isn’t essential for baking itself, but it does improve the final flavor. The coconut aroma intensifies and blends better with the cocoa and buttery dough after resting. So if you don’t need to serve the cookies right away, it’s worth giving them some time.